When I started getting interested in electrolysis, I faced the problem of finding a power supply suitable for the high currents required. At first I was using wall-warts that could only supply an amp or so. My electrolysis units started consuming more and more current, so I burnt out about three of those. I then decided it was time for me to get a better power supply. I had heard of many people using car batteries, but while those can supply a lot of current, they are expensive and cumbersome to charge. If you do use a car battery for electrolysis, you basically have to get a deep-cycle one to prevent damage when it is drained. I also searched for bench power supplies meant for electronics, but those were too expensive and did not provide enough amps. Bench power supplies are very regulated, which isn't that much of a deal when you aren't dealing with sensitive electronics. I finally stumbled upon a solution that would satisfy all my needs: a computer power supply.
 A computer power supply is cheap, and powerful. Computer PSUs also provide the voltages I need, such as 5 and 12 volts. There are varying degrees of quality when it comes to power supplies. There are extremely regulated, stable, and expensive power supplies intended for sensitive computer components, and there are cheap power supplies that aren't so regulated and can pose a threat to the electronics they power. I would never put a cheapo PSU in my computer, but they are perfect for the brute force needs of electrolysis. I picked up a 450W ATX PSU on eBay for only $30 USD. 450W is plenty for my generator, but if you have a huge one, I would recommend getting a higher wattage or better yet just get a second one. You should find out the amperage your generator consumes to find out what power supply fits your needs. Be aware that the different rails (5V, 12V, 3.3V) all supply different amounts of current. Make sure your power supply is ATX, not just AT.
Once you have found a power supply, the next step is modifying it so it is suitable for bench power supply use. A computer PSU cannot work outside of a computer without simple modifications. There is a great wikiHow article about how to modify it here. The step where you bundle wires with the same voltage is important. If you don't, running 13 amps through a single wire will cause it to glow orange, incinerate the insulation, and eventually turn to molten copper. Trust me, burnt insulation does not smell good. (Not that this has ever happened to me, though! :-) ) In addition, I did not have to add a dummy load resistor, but some PSUs require it. Most cheapo power supplies do not require one. Also, Instead of using banana plugs, I decided to use ring terminals instead. Banana plugs would probably be a better choice if you can use them.

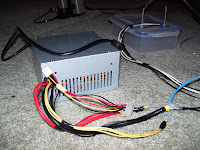
This is how I hook my generator up to the power supply. I basically solder the wires securely to a bolt and use a nut to fasten it on to the power supply ring terminal. Its important to get good solid contact between the terminals. If the current is being funneled through just a small area of contact, it might heat up or possibly weld itself together if the current is high enough. I make sure all exposed metal is covered by tape. Ideally these terminals would not be dangling around but so far I haven't bothered to fix this yet.
So far, my power supply has worked great, despite the constant abuse I put it through. If you have any questions about the process, feel free to ask in the comments.
Good luck!
 A computer power supply is cheap, and powerful. Computer PSUs also provide the voltages I need, such as 5 and 12 volts. There are varying degrees of quality when it comes to power supplies. There are extremely regulated, stable, and expensive power supplies intended for sensitive computer components, and there are cheap power supplies that aren't so regulated and can pose a threat to the electronics they power. I would never put a cheapo PSU in my computer, but they are perfect for the brute force needs of electrolysis. I picked up a 450W ATX PSU on eBay for only $30 USD. 450W is plenty for my generator, but if you have a huge one, I would recommend getting a higher wattage or better yet just get a second one. You should find out the amperage your generator consumes to find out what power supply fits your needs. Be aware that the different rails (5V, 12V, 3.3V) all supply different amounts of current. Make sure your power supply is ATX, not just AT.
Once you have found a power supply, the next step is modifying it so it is suitable for bench power supply use. A computer PSU cannot work outside of a computer without simple modifications. There is a great wikiHow article about how to modify it here. The step where you bundle wires with the same voltage is important. If you don't, running 13 amps through a single wire will cause it to glow orange, incinerate the insulation, and eventually turn to molten copper. Trust me, burnt insulation does not smell good. (Not that this has ever happened to me, though! :-) ) In addition, I did not have to add a dummy load resistor, but some PSUs require it. Most cheapo power supplies do not require one. Also, Instead of using banana plugs, I decided to use ring terminals instead. Banana plugs would probably be a better choice if you can use them.

This is how I hook my generator up to the power supply. I basically solder the wires securely to a bolt and use a nut to fasten it on to the power supply ring terminal. Its important to get good solid contact between the terminals. If the current is being funneled through just a small area of contact, it might heat up or possibly weld itself together if the current is high enough. I make sure all exposed metal is covered by tape. Ideally these terminals would not be dangling around but so far I haven't bothered to fix this yet.
So far, my power supply has worked great, despite the constant abuse I put it through. If you have any questions about the process, feel free to ask in the comments.
Good luck!